Add Printers
The i-Kiosk app supports adding printers via two methods: Auto Search (automatically detects connected printers) or Manual (add by connection type). Follow the steps below.
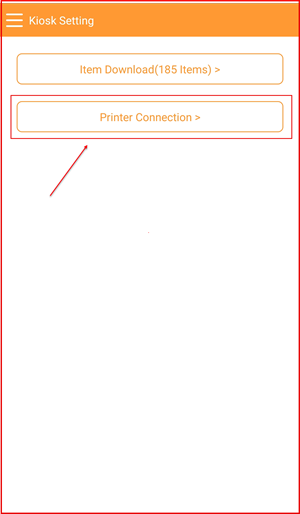
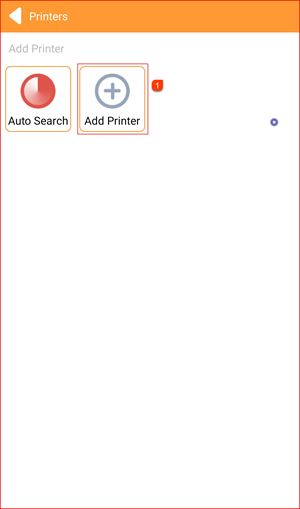
Step 1: Open Printer Connection
From the Kiosk Setting page, tap Printer Connection > to open the printer management screen.
Method A: Auto Search & Add Printer
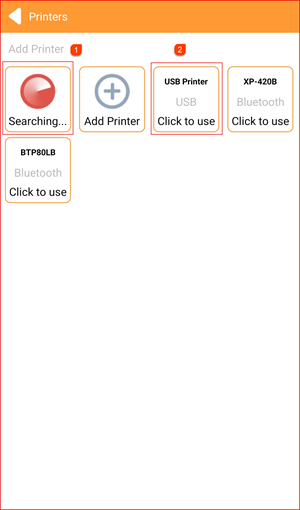
Step 2: Auto Search for Printers
On the Printers screen, tap Add Printer ①. The app will automatically search for available printers. Detected printers (USB and Bluetooth) will appear as tiles. Tap on the printer you want to add ② (e.g. USB Printer — "Click to use").
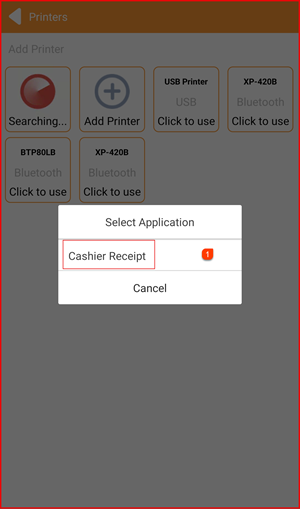
Step 3: Select Printer Usage
A Select Application dialog will appear. Tap Cashier Receipt ① to assign the printer as the cashier receipt printer, then tap the toggle to confirm.
Method B: Manual Add Printer
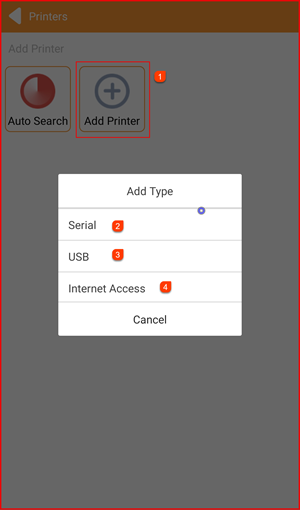
Step 4: Tap "Add Printer" Manually
On the Printers screen, tap the Add Printer ① button (the + icon). An Add Type dialog will appear with three connection options:
- Serial ② — Add a serial-connected printer
- USB ③ — Add a USB-connected printer
- Internet Access ④ — Add a network printer via IP address
Select the connection type that matches your printer.
Step 5: Select Printer Usage
After selecting the connection type and identifying the printer, a Select Application dialog will appear. Choose the printer role (e.g. Cashier Receipt) to assign how this printer will be used.
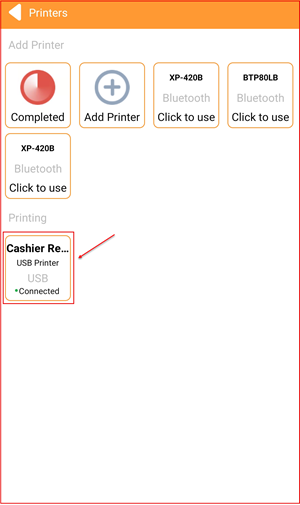
Step 6: Printer Added Successfully
The printer now appears in the Printing section of the Printers screen, showing:
- The assigned role (e.g. Cashier Re…)
- Printer name (e.g. USB Printer)
- Connection type (e.g. USB)
- Status: ● Connected
Step 7: Printer Settings Inside
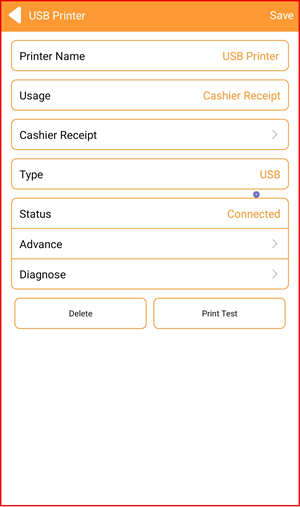
Tap on an added printer in the Printing section to open its settings. The printer detail screen shows:
- Printer Name — Name of the printer (e.g. USB Printer)
- Usage — Assigned role (e.g. Cashier Receipt)
- Cashier Receipt — Tap to configure receipt print settings
- Type — Connection type (e.g. USB)
- Status — Current connection status (e.g. Connected)
- Advance — Advanced print settings
- Diagnose — Run a printer diagnostic test
Tap Delete to remove the printer, or Print Test to print a test page. Tap Save at the top right to save any changes.
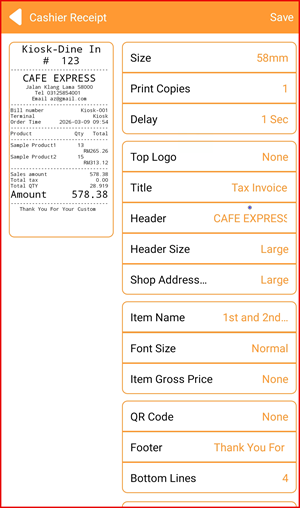
Step 8: Cashier Receipt Settings
Tap Cashier Receipt to configure how the receipt is printed. Available settings include:
- Size — Paper size (e.g. 58mm)
- Print Copies — Number of copies to print
- Delay — Print delay (e.g. 1 Sec)
- Top Logo — Show or hide logo at the top
- Title — Receipt title (e.g. Tax Invoice)
- Header — Store name header text
- Header Size — Size of the header (e.g. Large)
- Shop Address — Display size for address
- Item Name — Display format for item names
- Font Size — Receipt font size (e.g. Normal)
- Item Gross Price — Show or hide item gross price
- QR Code — Include QR code on receipt
- Footer — Footer message (e.g. Thank You For…)
- Bottom Lines — Number of blank lines at the bottom
Tap Save at the top right when done.
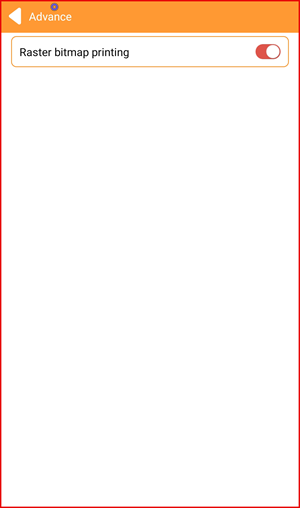
Step 9: Advance Settings
Tap Advance from the printer detail screen to access advanced settings:
- Raster bitmap printing — Toggle on to enable raster bitmap printing mode (recommended for printers that have rendering issues with standard text mode).
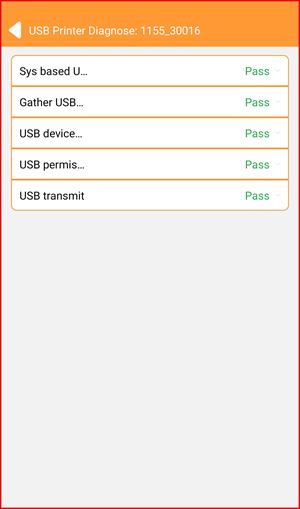
Step 10: Diagnose Printer
Tap Diagnose from the printer detail screen to run a full diagnostic check. The system will test all aspects of the printer connection and display Pass or Fail for each item:
- Sys based U…
- Gather USB…
- USB device…
- USB permis…
- USB transmit
All items showing Pass confirm the printer is functioning correctly.